Painting Internal Wood Doors
Although Thorndown Wood Paint is specifically designed to stand up to the rigours of external timber protection, it is also the perfect wood paint to use on internal woodwork such as interior doors.
Being water-based with minimal VOC and low odour it’s a pleasure to use especially when you’re painting inside and don’t want to be knocked out by fumes for days on end.
Thorndown Wood Paint is hard-wearing and highly water-repellent so you can clean it down without affecting the coating. This also makes it great to use in areas of high moisture such as bathrooms and kitchens.
We use architectural exterior-grade VOC free colour pigments in our paints so the colour remains strong and true for up to 10 years.
Painting your interior doors with our wood paint is simple and quick. Here’s a check-list to help with your painting.
Prep
- You can overpaint old coatings. Sand back any loose coatings and fill cracks with a flexible filler such as caulk. Make sure it’s one that’s easy to overpaint with a water-based paint. Once dry, use fine sandpaper to sand back to a smooth flat surface
- Clean the wood work with soapy water and leave to dry thoroughly. If it’s a kitchen door that may have lots of old grease and oil on it, then use a stronger cleaning product such as sugar soap to remove old oil otherwise paint won’t fix and bond properly to the door
- No primer is required as the resin we use is self-priming. However if you are painting a metal or uPVC door then use a multi-purpose primer to ensure a strong bond for the paint, although Thorndown Wood Paint does adhere well to most metals, uPVC, and coated surfaces such as melamine
- If you are painting a new wood door then you may want to use a stain-blocking primer or knotting agent to block any resin bleed or tannin staining the new paint coating. If you’re painting over a previous light paint colour and can see tannin or knot staining coming through the old coating and don’t want this to happen on your new paint coating, then apply stain blocking primer before you paint the topcoats of fresh wood paint. On darker colour paints tannin staining isn’t so noticeable so you may not need to bother with this
- With the majority of wood paints you can use a brush or roller. We recommend using a high quality synthetic brush for the best results, or a roller with a short pile or foam sleeve. Make sure that the width of your brush or roller matches the width of your surface to get the smoothest paint finish, so for panelled doors use a brush the same or close to the width of the panelling, and with rollers, use a small roller. For large flat door surfaces use a wide brush or roller so that you’re not having to apply paint in lots of small sections that can lead to a messy, streaky finish
- Cover flooring with old newspaper, cardboard or an old sheet to protect from drips. Mask off areas that you want to protect from paint such as painted walls or door frames that you don’t want new paint marking, and either mask off or remove door furniture such as handles and you’re ready to go. Most people will need a step ladder to reach the top sections and edge of the door
Painting
- For interior doors you can use a wood stain for a natural wood look on new wooden doors, or a wood paint or good quality wall paint. Thorndown’s Wood Paint is specifically designed for wood, ensuring a strong bond and allowing the beautiful grain and nature of the wood to come through the satin coating. Or for a flat matt finish you can use Thorndown’s Wall Paint which also adheres well to metal and wood
- You don’t have to stick to any rules on paint colour for interior doors – they don’t have to be white! If you have a wooden door and want to keep that lovely wood look then you can use UV Clear to retain that beautiful natural timber look, or if the wood needs refreshing then you can paint on one of Thorndown’s translucent wood tone colours such as Beech or Ash to lift and refresh the wood.
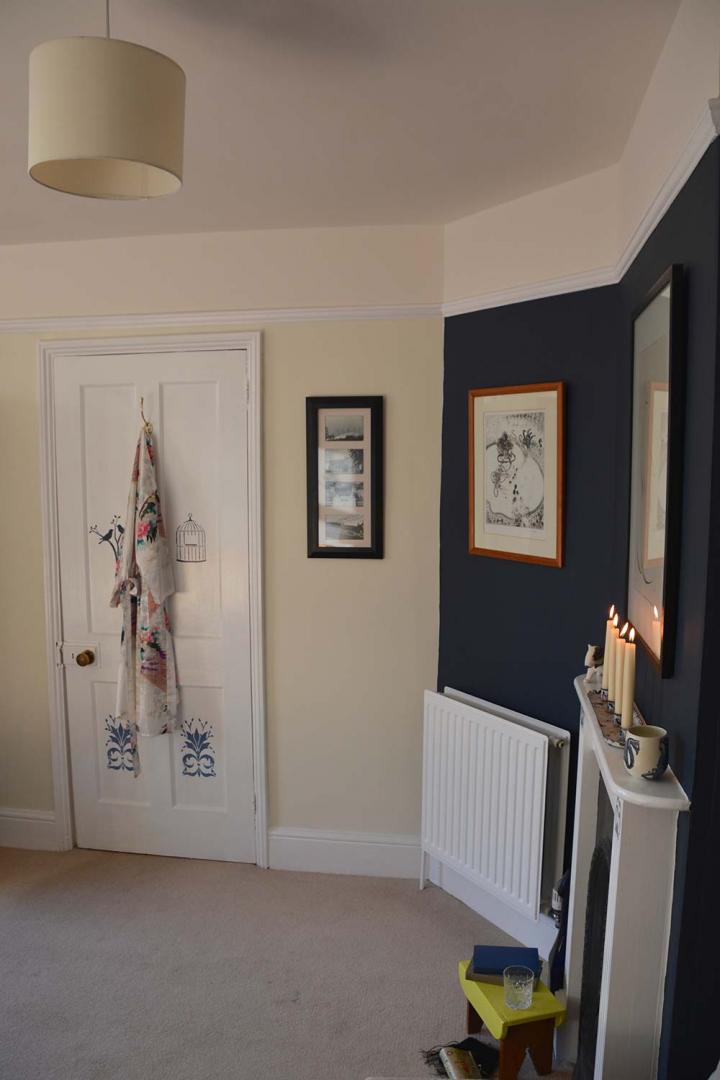
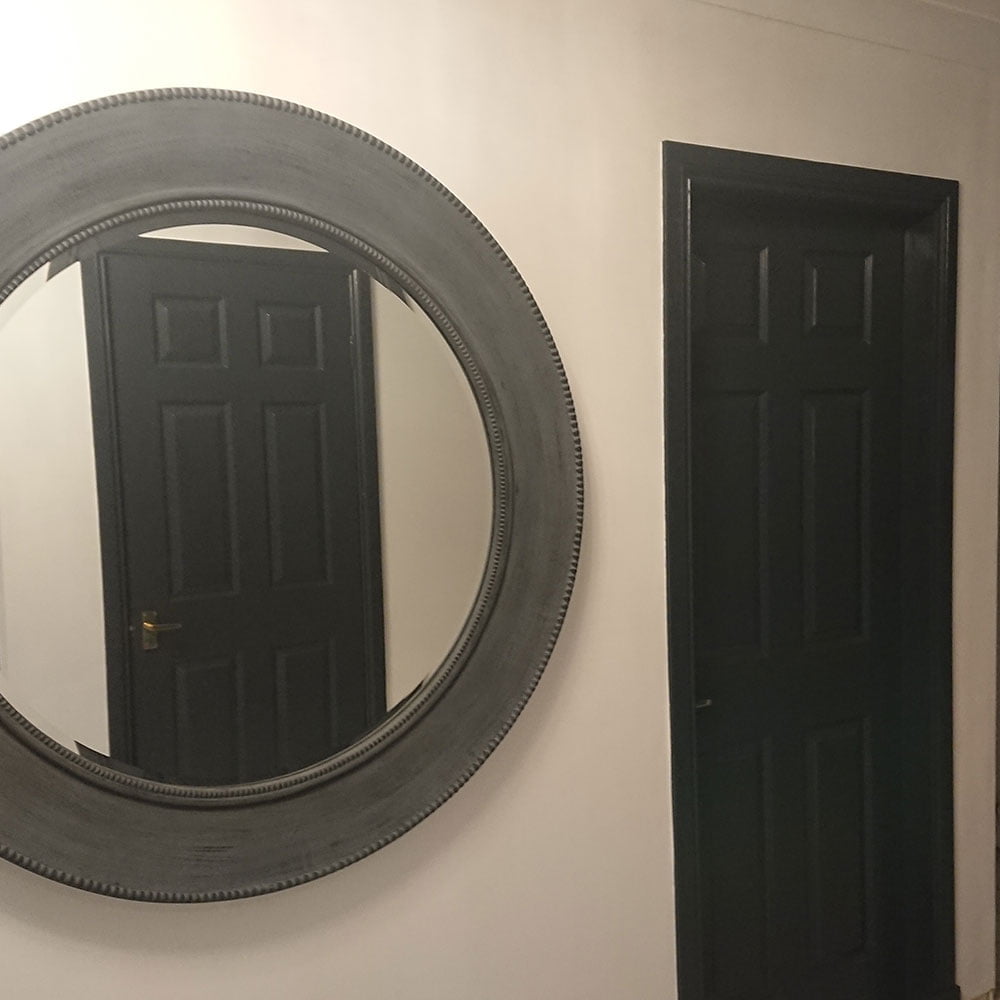
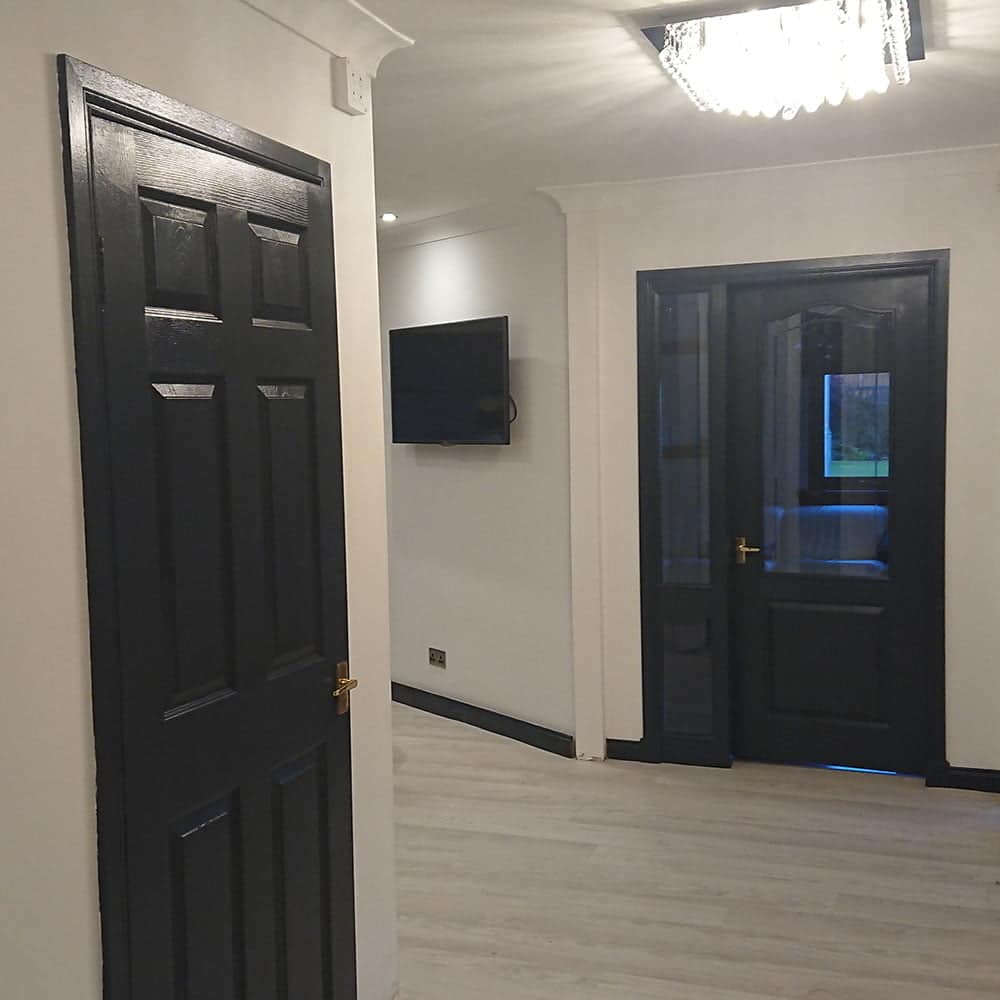
White will look lovely and fresh and goes with all wall paint colours, but you can use an off-white or cream to tone well. Or be brave and go for a lovely bold colour such as Anthracite Grey on the door, frames and skirting boards to tone in with wall accessories as pictured, or the gorgeous deep Avalon Blue in the hallway shown in the picture which was used on the door, frames, skirting boards and wall panelling.
Painting a door the same colour as the walls can create a hidden door effect and look very elegant.
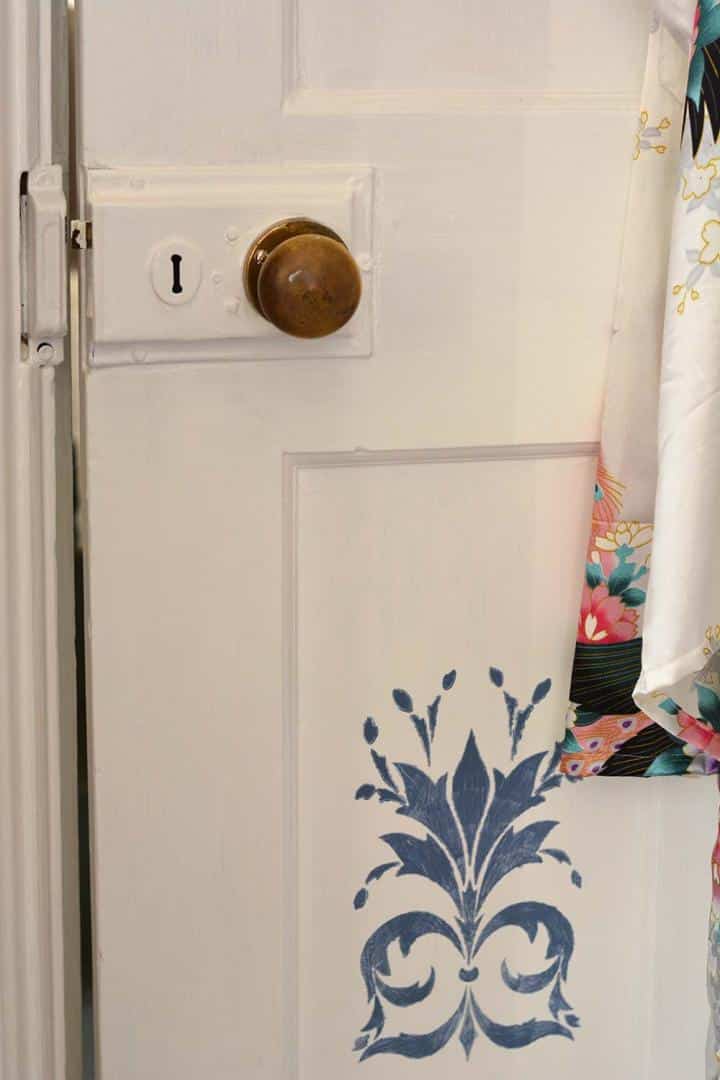
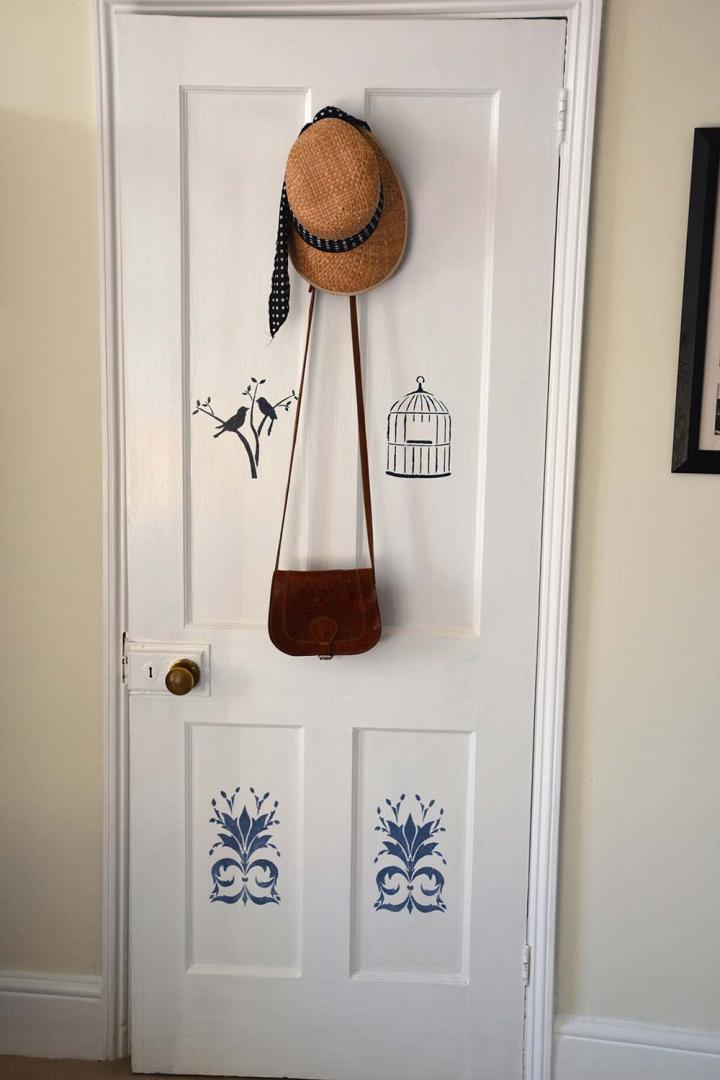
To add some fun or personal detailing to a white door you can paint the door edge a different colour to match the room that it leads into, or paint stencilling on the door as shown in these pictures of a bathroom door and a bedroom door. The bathroom door edge, door knob and stencilling are in Cavepool Grey to match the paint on the bathroom panelling. Stencilling on the bedroom door is in the same blue tones of the wall paint, giving a nod to and tying in with the interior design.
The only rule is to consider the colours and décor of the rooms that the interior door leads into, and to make sure that the colour you choose is one you love! - Apply paint working methodically, a section at a time, painting with the grain. Paint up to neighbouring wet paint until you’ve finished. If you’re painting a panelled door then start with the interior panels painting the bevelled edges first then the interior panel. You will need to use a brush for the bevelled edging sections as a roller won’t get into all of the nooks very well. Then finish off by painting the frame. I like to paint the door edges first then the main frame sections.
To get the best and smoothest coating, it is recommended to sand off in-between coats, and apply thin paint coats. Use a very fine sandpaper so as not to remove too much of the paint coating. The idea is to remove any small imperfections such as tiny air bubbles or areas where ‘blobs’ of thicker paint were applied.
If you’re painting with a roller then ideally you should use a laying off brush to finish each coat. A laying off brush has a thinner bundle of bristles with finely-tipped ends, designed to be used dry (with no paint loaded on) to feather the paint so no application marks are visible. You can get some good tutorials online of feathering techniques but the simple idea is to run the brush lightly over the fresh paint in all directions, horizontally, vertically & diagonally, so that the paint is perfectly smoothed out on the surface. Always make sure that your last strokes are going with the grain. Pop the laying off brush into a pot of water in-between coats to keep paint from drying on the bristles and to ensure it glides over the next paint coating. - Leave paint to dry for 1-2 hours before applying a second coat
- With Thorndown paints, two coats is all you need for a rich, full protective coating. On lighter colours such as Swan White or creams a third coat can increase the intensity and solidity of the colour coating. You can apply just one good coat of the darker colours
- Allow to dry for as long as you can before closing the door. Although the paint will be touch dry it will need hours to fully fix and cure, so leave it as long as possible. If you close the door before the paint has fully fixed then you risk it sticking to the door frame. If you’re painting the interior side of an exterior door, try and pick a warm dry day so the paint dries quicker and you can leave the door open without getting chilly
- With water-based paints you can wash your utensils with water using a spot of detergent if need be, put the kettle on and congratulate yourself on a job well done.
Seal your paint tin lid firmly and store paint somewhere that it won’t freeze or be exposed to extreme heat. If you clean paint off the outer rim of the lid it will seal better and you won’t get paint sticking and sealing it shut. Our wood paint has a high solid content so it’s especially useful to do this and if your paint tin rim is covered in paint too, then clean that off with some kitchen roll or a paint cloth. The paint will then last a couple of years, or more, for maintenance and touch-ups
Extra tip
If you’re painting a door that is plastic coated or uPVC, having visible brush strokes can make it look like a wooden door!
These doors were painted with RAL 7016 Anthracite Grey wood paint to match the rest of the interior design, looking very striking and chic.
When Is A Door Not A Door? When It’s Adoorable!!
Every house has a number of doors and they can all just blur into one. Every door the same old style, with the same old paint.
Well we like to have fun with our doors and have painted some up with decorative design details and stencils. The doors were painted with Swan White Wood Paint with stencilling and detailing in other colours to bring them to life.
A simple trick is to paint the edge of the door in a contrasting colour or a colour from the room that it leads into or out of. We also love stencilling as it can be a fun and easy way to inject some interest and design elements into otherwise pretty dull areas.
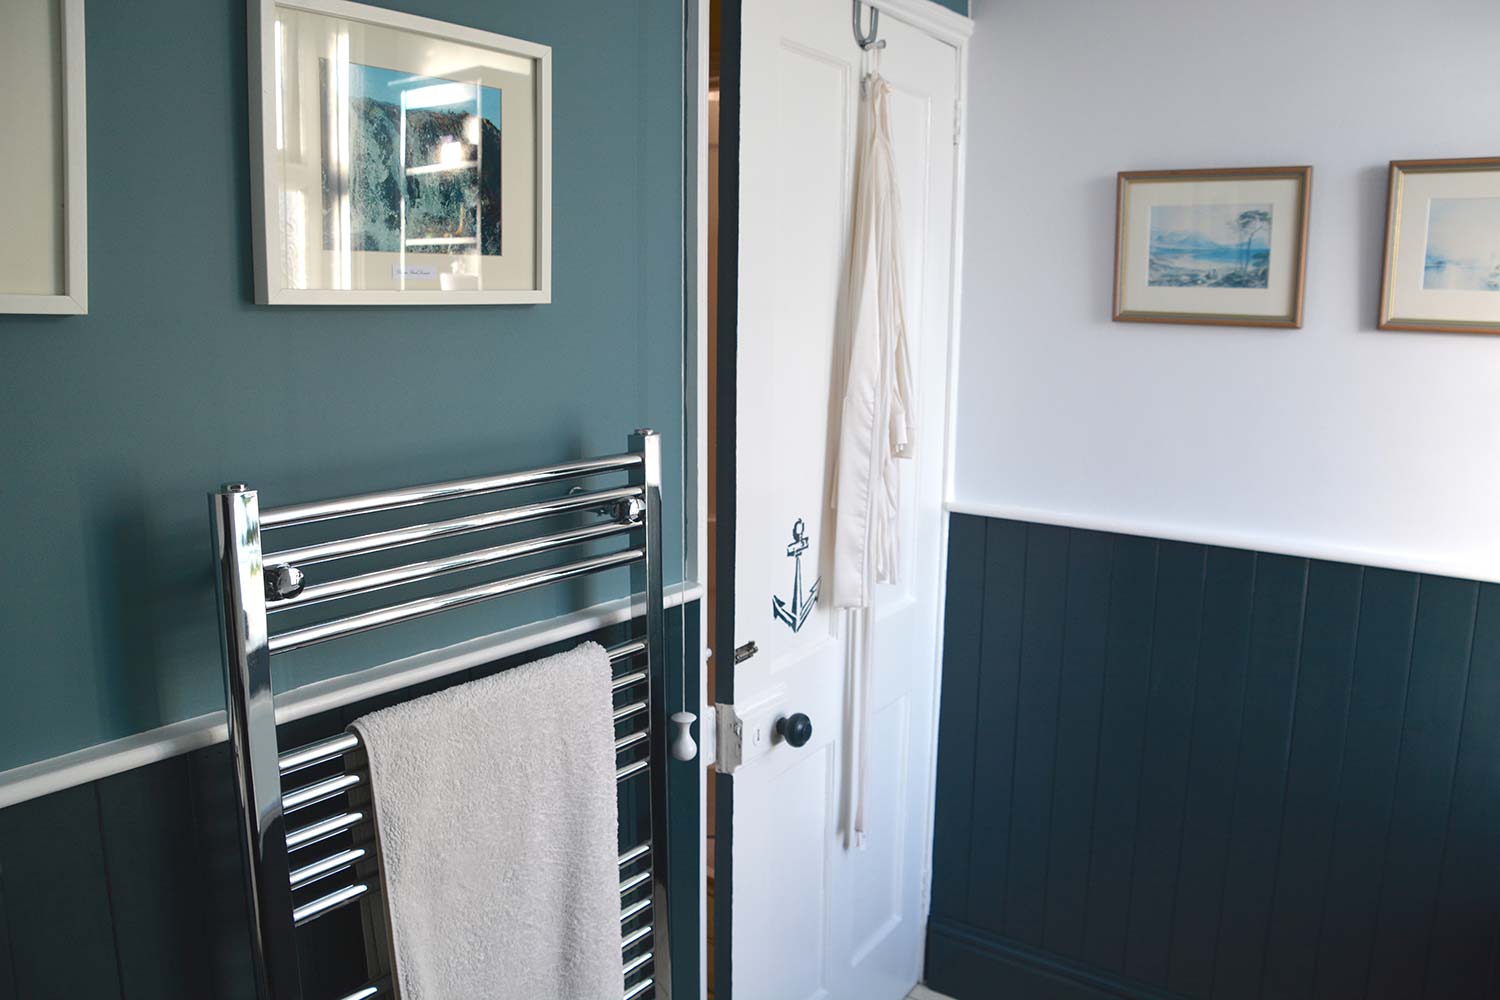
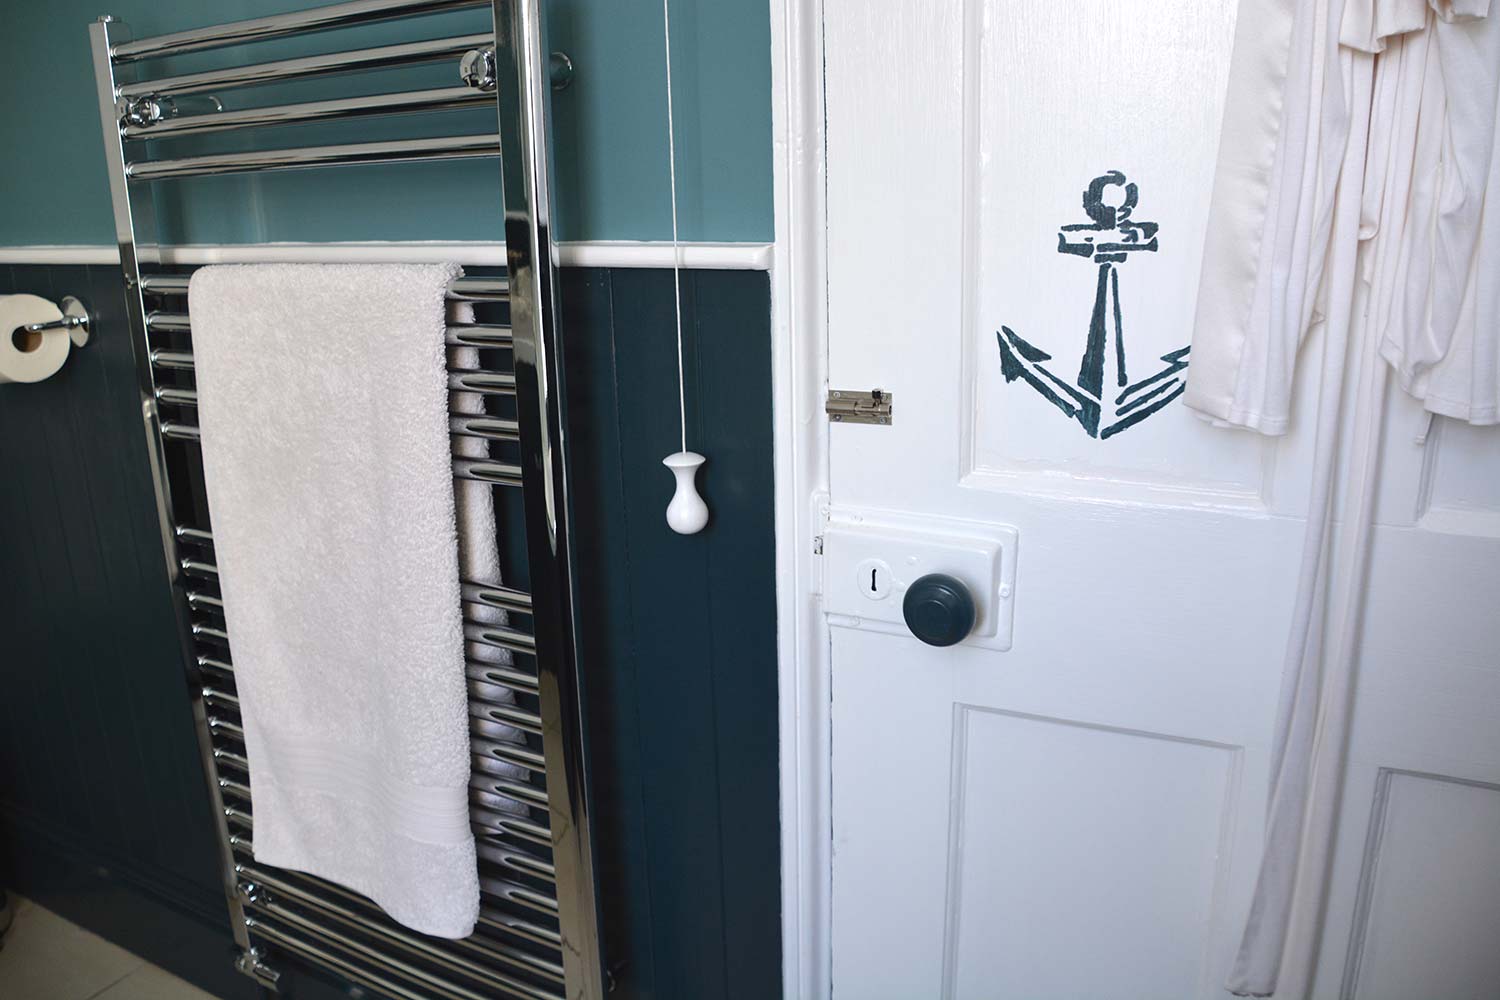
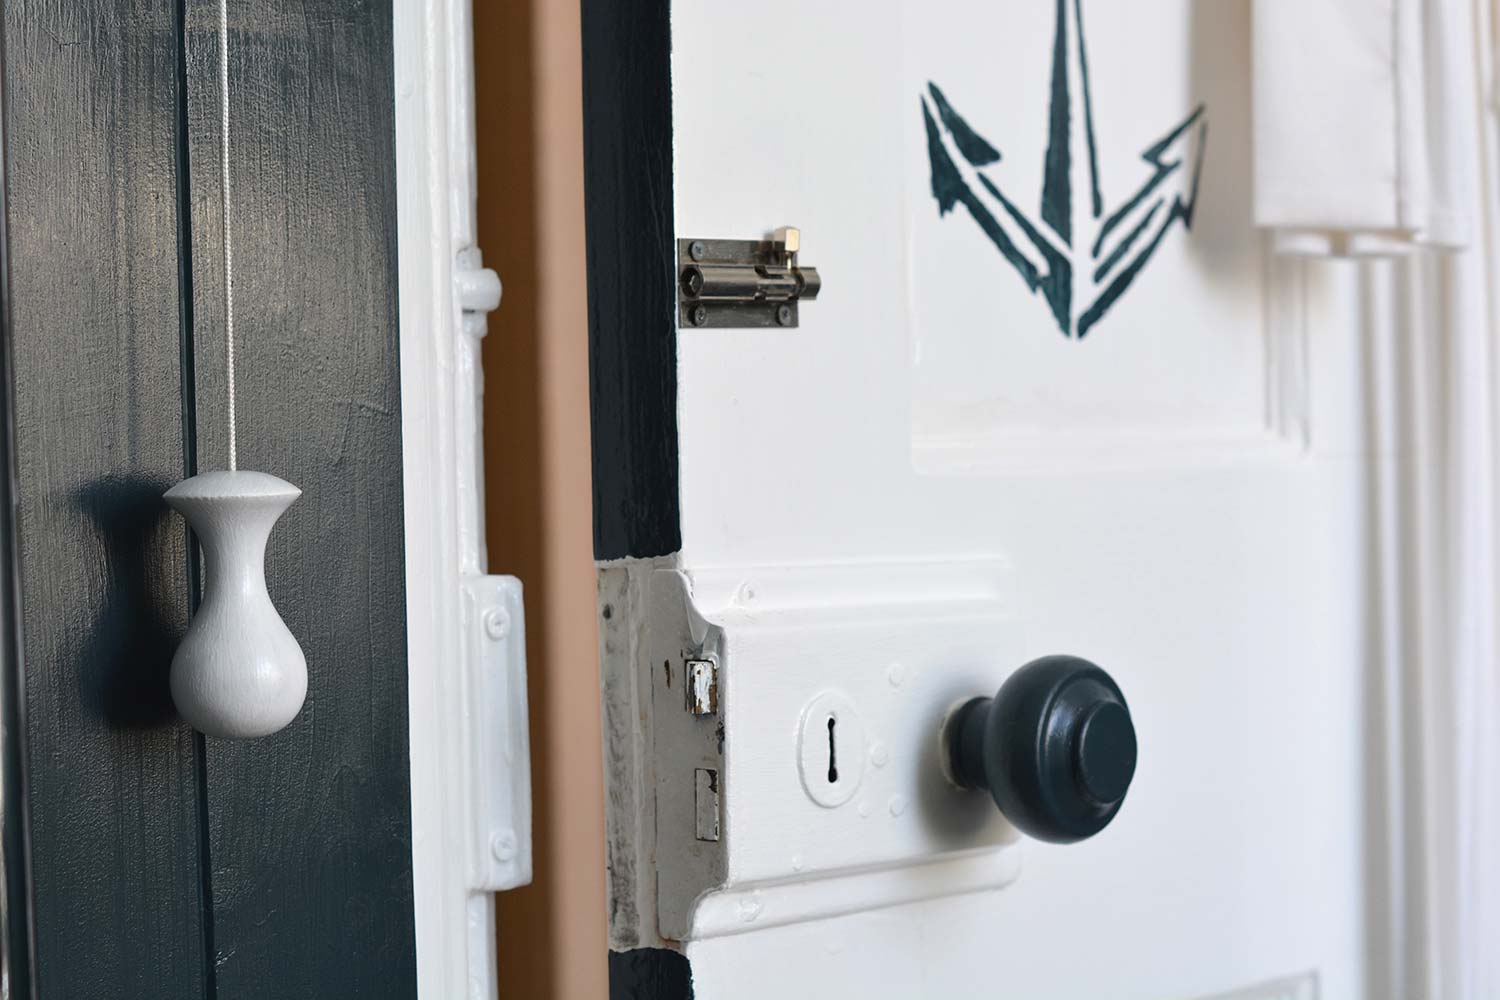
In the bathroom I used a simple anchor stencil from one of our favourite collections by Ed Roth. It is painted in the same Cavepool Grey Wood Paint colour as the door edge, door knob, bathroom panelling, shelves and even the loo seat.
It takes minutes to do and helps create an attractive and unified design.
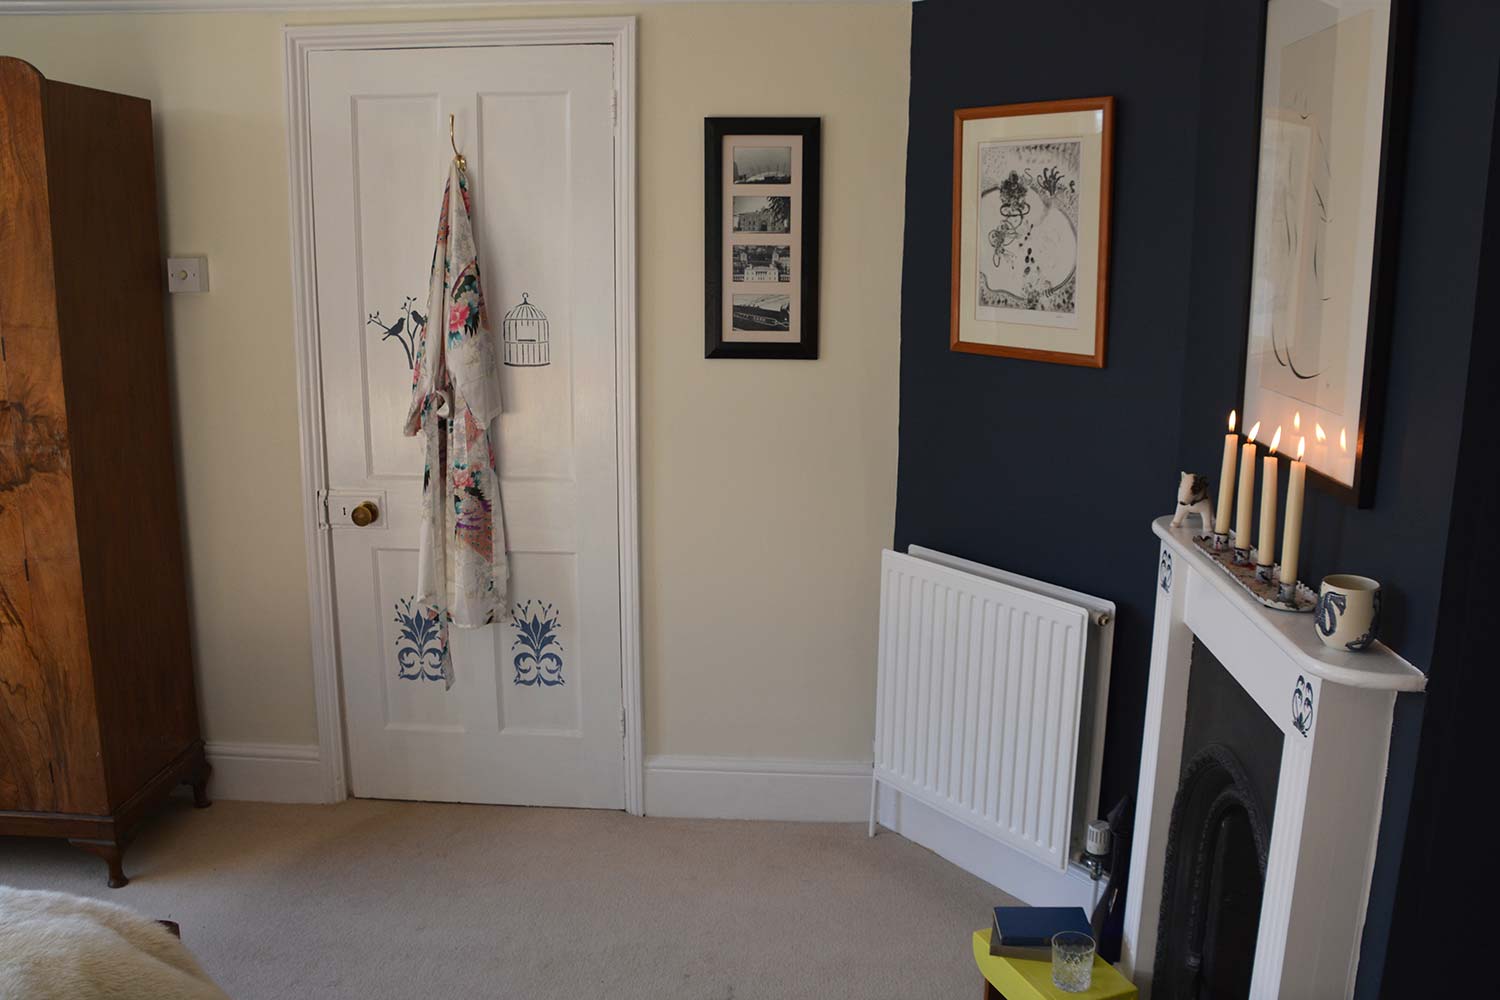
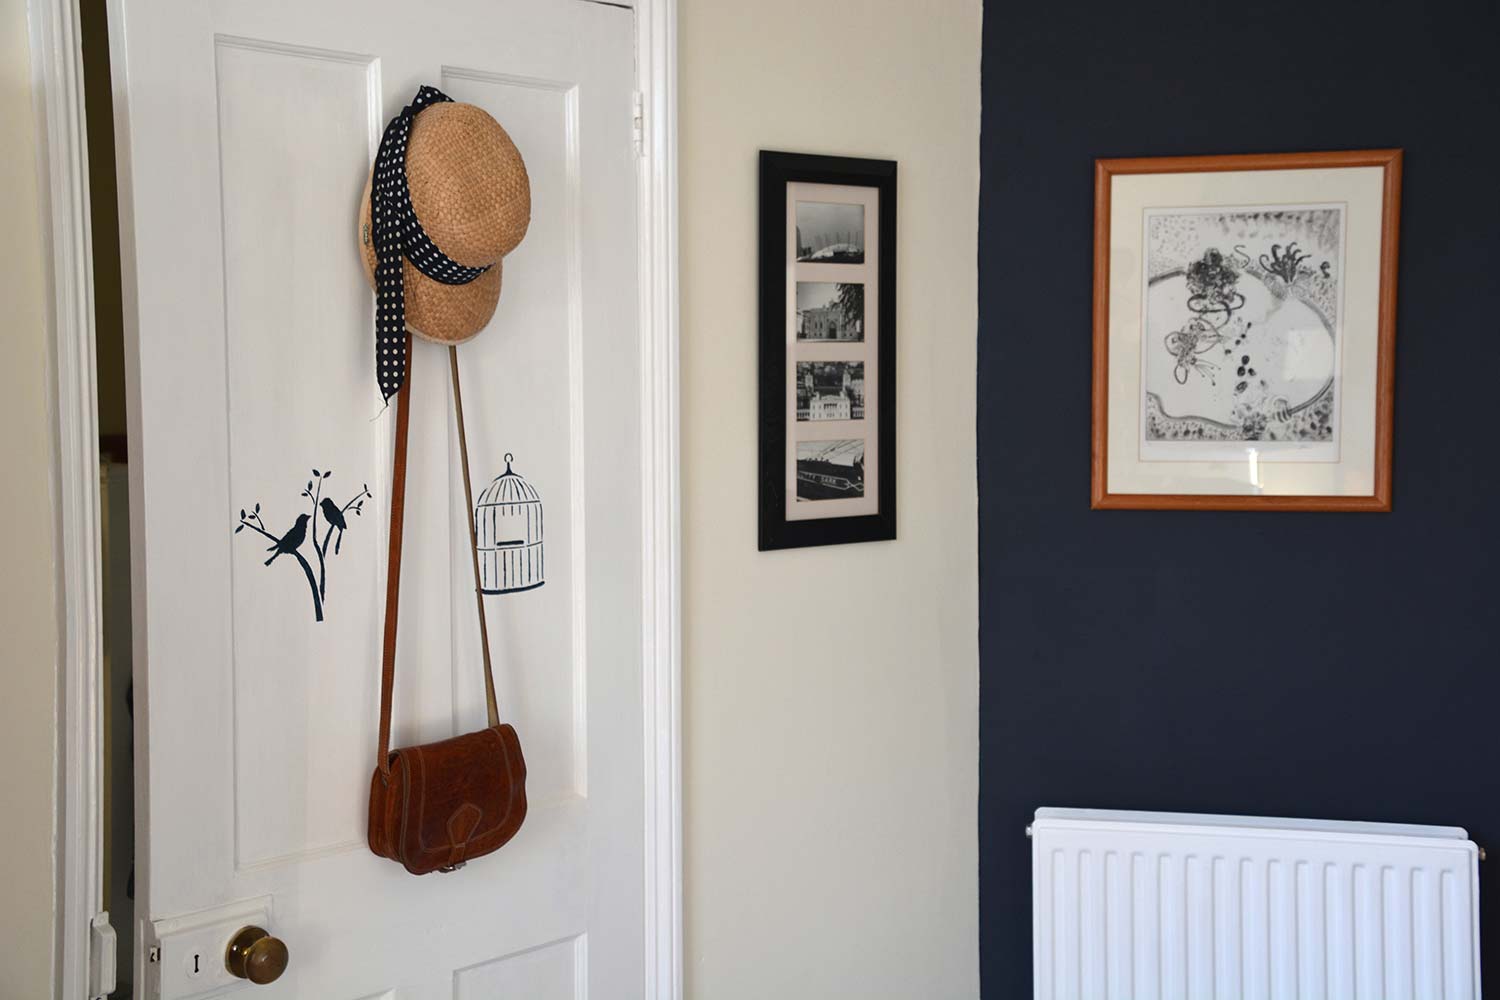
On this bedroom door I combined a couple of stencils from the same Ed Roth collection with some stencil designs from an old interior decorating book. Colours used are Bishop Blue and Peregrine Blue to contrast with the wall colours.
I love the way these designs add a soft, feminine feel and integrate the door with the colours and décor of the rest of the room.